

(Setup Guide) JTD-SP0103 - 1x3 SPDIF Optical Splitter
- Categories
- Product Guides
- Published
J-Tech Digital 1x3 SPDIF Optical Audio Splitter – Distribute high-quality digital audio to multiple devices easily and reliably

How to Set Up Your J-Tech Digital JTD-SP0103 (JTD-42) 1x3 SPDIF Optical Splitter with Digital Audio
Product Link:
https://www.jtechdigital.com/products/audio-splitter-1x3-spdif-optical-splitter
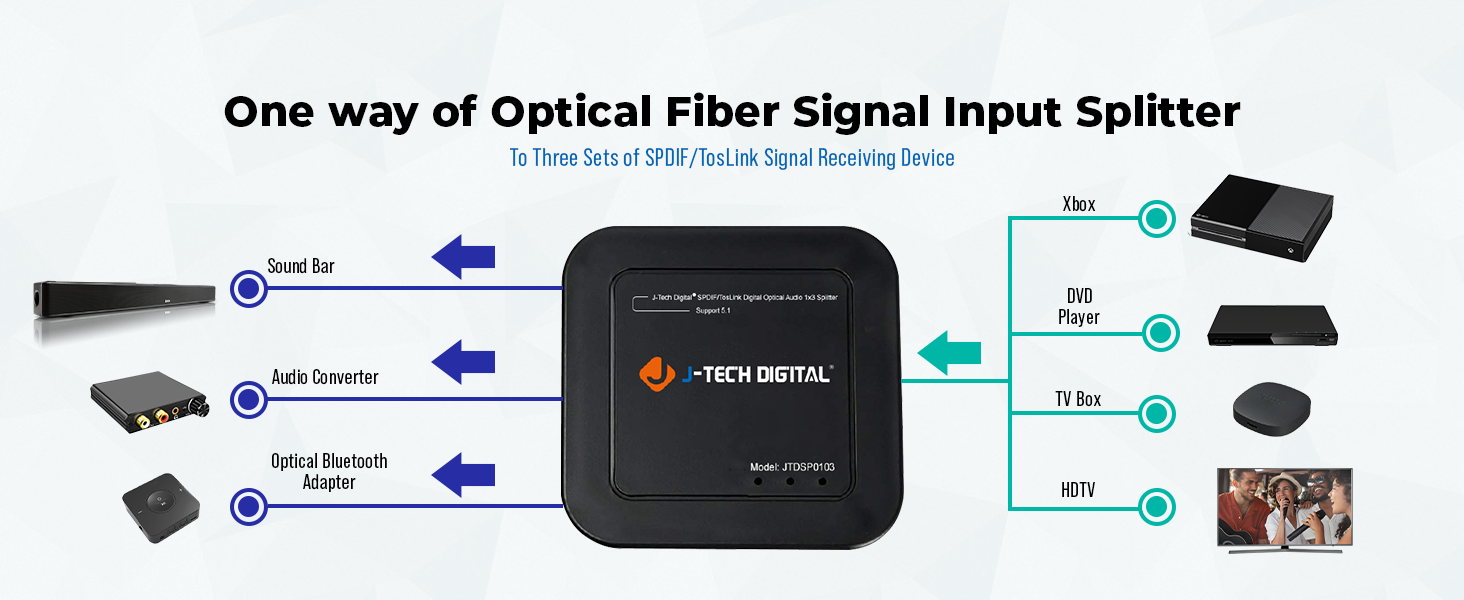
The J-Tech Digital 1x3 SPDIF Optical Audio Splitter (Model: JTD-SP3OS) allows you to distribute a single optical (TOSLINK) audio signal into three identical outputs simultaneously. This is ideal for sending audio from one source (Blu-ray player, game console, TV, streamer, etc.) to multiple audio devices such as soundbars, receivers, or DACs.
It supports sampling rates up to 96 kHz, 24-bit audio, and formats like LPCM2.0, Dolby Digital, and DTS 5.1 (not compatible with Dolby Digital Plus, Dolby TrueHD, DTS-HD Master Audio).
- Triple Optical Fiber Splitter: Allows a single optical fiber signal to be distributed to three SPDIF/TosLink devices simultaneously.
- Wide Audio Format Support: Compatible with Dolby Digital & DTS 5.1, as well as PCM Stereo at 32kHz, 44.1kHz, 48kHz, and 96kHz. Plug & play functionality.
- Signal Re-Timing: Maintains stable signal integrity and reduces jitter for high-quality audio output.
- Low-Loss Transmission: Optical fiber cable with less than 0.2 dB/m loss, supporting output distances up to 130 ft (40 m) without degradation.
- Over-Voltage Protection: Safeguards the device from damage caused by incompatible power adapters.
- Lossless Audio Quality: Ensures no reduction in sound quality during signal splitting.
What’s Needed for Setup
🟢 Included in the Box:
- 1 × J-Tech Digital 1x3 SPDIF Optical Splitter
- 1 × 5V DC Power Adapter
- 1 × User Manual
🔵 Required (Not Included):
- 1 × Optical Source Device ((e.g., Blu-ray player, PS/Xbox console, TV with optical out, or media streamer))
- Up to 3 × Optical-Capable Audio Devices (e.g., soundbars, receivers, DACs, powered speakers)
- Optical (TOSLINK) Cables (one per connection)
Step-by-Step Installation Guide
- Power Up: Connect the included 5V DC adapter to the splitter and plug it into an AC outlet.
- Connect the Optical Source: Using an optical (TOSLINK) cable, connect your source device’s Optical Out to the splitter’s SPDIF Input.
- Connect the Outputs: Use up to three optical cables to connect the splitter’s outputs to your receivers, soundbars, or DACs.
- Confirm Audio Settings: Ensure your source device’s audio output is set to PCM 2.0, Dolby Digital, or DTS (formats supported). For TVs, verify audio output is set to Optical/External Speaker in the sound menu.
Troubleshooting Tips
- No audio output?
- Check that all optical cables are securely seated (you should see red light inside when connected). • Verify that your source is outputting in a supported format (PCM 2.0, Dolby Digital, or DTS 5.1).
- Only stereo audio is playing?
- Ensure your source device is set to output Dolby Digital or DTS instead of PCM Stereo (if multi-channel desired).
- Still not working?
- Power-cycle the splitter and connected devices. • Try replacing the optical cables to rule out damage.
Call our team at (888) 610-2818 or email us at sales@jtechdigital.com or support@jtechdigital.com for more information!